Archive | February, 2013

Tags: , , , , , , , , , , , , , ,

The Folding Knife

Posted on 25 February 2013 by duracles

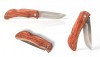
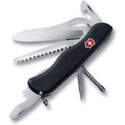
One of the primary tools for the Survivalist is the Folding Knife. This is used for food preparation, as pry bar, screw driver, box opener and self-defense weapon. In most cases, the Urban Survivalist will use it to open mail, packages, and to cut twine. The country counterpart will use it to whittle, cut rope, prepare food, or even dress game. In a full on survival situation, a person could find themselves prying a screen off a window, or forcing a lock, cutting clothing from an injured person, or finishing off injured game. Possibly digging a hidden item out of the ground, using as a tool to make other tools or weapons, or using it as a last ditch defensive weapon. Definition of the “full on survival situation” would be any situation where the tool needed is critical; meaning that its failure would be devastating or catastrophic. To prevent this and to educate folks new to survival preparations as well as self-defense I would like to go over selection, materials, types, and carry of the survival folding knife.

folding knives

Image courtesy of [image creator name] / FreeDigitalPhotos.net

First, the knife must be of a legal to carry length. For instance in Colorado, the statewide legal length from guard to tip is 3.5 inches with a single edge. Ballisong, switchblades, gravity knives, double edged and ballistic knives are illegal weapons in Colorado. You do not want to get caught carrying an illegal knife period. You could end up in court with an illegal weapon charge, and if you have to actually use the knife in self-defense the first thing to be used against you would be that it is a illegal size or type. Also, if you have a job or are walking through a metal detector and accidentally forget it is there you won”t be arrested, fired, or at the least lose your survival tool to the authorities. Some states have laws regarding when, how, and where you carry and also rules regarding concealment. Keep this in mind as it is very important, especially in extreme circumstances as mentioned above or in cases of martial law, evacuation, or even during routine police stops.

Secondly, we need to consider type after we have established the legal guide lines. The most versatile types must be considered. It needs to be quick to access, easy to find in darkness, easy to identify by feel, and safe to carry. It also must not fall off, drop out of the pocket, or be too obvious or cumbersome. You want it to blend in, but not so much that you cannot get to it in an urgent moment of need. Most modern folding knives have some sort of clip that is mounted to the handle of the knife. They should be steel, and riveted or screwed to the knife. Glue will not do! Folding knives stored in a sheath are much slower to get to although you may want to carry a second one as back-up this way. The knife should be designed with your “handed-ness” in mind. Meaning if you are right hand dominant, it needs to be worn on the right and so on. Also most modern folding knives have legal thumb studs or other apparatus to thumb or finger the blade open. Go to a dealer and try as many as you can, do not just order the latest and greatest without trying it first. Narrow it down to 2-3 types you are comfortable and consistent with.

When you have established what types are easiest for you to access and open, then you need to consider the materials it is made from. If you are purchasing the knife from an established manufacturer, you should be able to go on-line or in a catalog and find the brand, model, and specifications. You will see specs for length, weight, blade material, handle material, lock type, and possibly Rockwell hardness and grind. If you are indeed buying from a well known manufacturer, basically you want to narrow the blade material down, as well as warranty. All the other details, while important, are lower priorities. Most blades are more or less rust resistant depending on grade, and are harder or softer so will be harder or easier to sharpen and hold an edge. The harder steel is not necessarily the better grade however! If you are really hung up on this, educate yourself on knife steel grades at the library with books written in 2005 and up. Ideally you will want to know if it is rust resistant, rust proof, or if you will need to oil it regularly. This is important for those who will use it hunting, preparing food, boating, in wet climates, and such on a regular day-to-day basis. This may also affect the handle material choices.

Once you have analyzed your needs based on use, climate and personal preferences you want to consider your budget. This is where people really blow it. I managed two knife stores for a total of 11 years, and also collect and work gun shows time to time. I have seen so many people get fixated on price, then go for a “cheap” knife. A really good dependable knife will cost you between $80 and $350 dollars with most being about $150 USD (2008). If you plan, and only purchase one good folder this cost will be mitigated. For the Survivalist this budget is important as you have many other needs and equipment to purchase. The wise minded survivalist will get the best he can afford. You will want to consider the warranty again, and the history of reliability from this manufacturer. Go on-line to various knife forums and see what people say. Also, talk to local vendors and emergency personnel including police, military and fire rescue. They usually get the good gear and have experience using it.

Lastly, when looking at knives for your personal survival tool, consider how it will be used. It must be thick, strong, sturdy, have a safe locking mechanism, sharp, easy to sharpen, easy to safely grip, and designed with function in mind. Do not get side-tracked about how it looks or how cool it is. Also, it must be able to perform many tasks. Do not forget that this may be the last ditch defensive weapon or the ONLY weapon you have to defend yourself from attack. It may be multiple two-legged assailants or a dog, or possibly it will be used to fight your way to your firearm or other defensive tool. It may be used to skin and dress game, dispatch wounded animals, make a temporary wilderness shelter, used to make other tools and weapons, and so on. This is really the crux of a survival knife, let alone a folding pocket knife. Ideally you will have a bigger fixed bladed knife, but on a day-to-day basis will you really carry a 6 inch fixed blade to work in your briefcase or purse? Most of us will say no. Also, in step with preparedness in general it is important to have equipment on you while you do your daily travels, work, and leisure activities. We really cannot predict when something bad will happen so we must always be ready.

After you have purchased your knife, make sure the screws on the clip are tight but don”t over tighten. Also you will want to practice drawing and opening your knife. Do not rely on “flicking” or using gravity or centrifugal force to open your blade. You want to use the factory apparatus or thumb stud to open the blade. It is easy to drop or toss your knife while flicking it open, and this also creates wasted movement. It may also telegraph your intent, your weapon, and make more sound. You want to practice the art of subtlety, more like a samurai or medieval duelist than a barbarian or movie hero. After you have mastered the draw, work on speed and economy of motion. Less is better! Once your draw is fluid, then practice opening in the dark. You will find that with enough practice you can keep your eyes on the task or threat without having to look down at your knife. Finally, when you can draw in the dark by feel go to practicing in a lighted room but practice drawing while tying your shoe, bending, getting a wallet with the other hand, while stepping forward, back or sideways, and while issuing verbal commands like “Stop!” You may also want to transition to a defensive stance and be aware that you usually want the knife in a forward dominant hand.


This brings us to grip. How you hold and use the knife is just as important as the knife. You want to cut away from yourself when opening packages, or mail. Same when you are dressing game, whittling a arrow, or prying something. You always want the point and sharp edge to point away from you so that if you slip it will not cut or stab you.

Also, just as important you want the actual grip to be strong and secure so that the knife does not slip away or slip out of your hand completely. When a person is in an emergency, their focus can be easily distracted. Also, adrenaline, sweat, blood, water, oil or physical obstructions could impair or destabilize the grip. Make sure you practice using your knife safely and if you practice using it defensively make sure your grip is secure. One fun thing to do is to gently stab a card board box, then shave the box, then cut the box into pieces. You will see how different jobs and forces will affect grip. Be careful as you can easily get cut during this process.

Grip is also very important during a defensive counter attack. As mentioned above, you want the knife in your dominant hand, lead leg forward. This gives you maximum reach or range to stab or slash at a attacker. Keep the knife in a point forward grip like you would a razor knife to cut drywall for instance. Not like a hammer, or reverse like a ice pick. People with professional knife fighting training will sometimes use a reverse grip, but that requires training and is beyond the scope of this article. Basically you want as much room as you can get between you and the attacker, and you want to be able to cut without exposing your vital areas to the attacker. The most basic way to do this is as mentioned dominant hand forward, lead leg forward. You can also lunge forward this way or spring backward and still be able to counter attack.

Some tips in general for the folding knife and the survivalist:

  • Carry the longest blade you can legally carry in your state. Be reasonable on this! There are unusual 6 inch folders, but why not get a fixed blade at that point?
  • The knife should blend or be concealable, and should be easily accessed.
  • Get brand name knives including custom folders from well known makers.
  • Key chain or other gimmick knives do not fit the bill of the robust folding survival knife. These might work as a secondary or tertiary knife however.
  • Consider your secondary knife to work weak handed as a back-up.
  • Also consider a multi-tool as back up. They usually have locking blades with a variety of designs.
  • Make sure the handle is not too slippery or too shiny. You want a secure grip and something that blends in with your wardrobe.
  • Learn to disassemble, clean, sharpen, and oil your knife. Look at a small sharpener for your key chain, pocket or survival kit.
  • Although double edged folders are out there remember to be reasonable and to keep it legal. Also, single edged knives are more utilitarian in nature.
  • Make sure the knife stays on your belt or in your pocket.
  • Carry it every day everywhere you go, including in your robe, underwear or sleep garments, exercise clothes, or business suit. Take it off when you are actually sleeping or bathing.
  • Be careful carrying other gear in the same area. Sometimes the knife may open in your pocket and you could get a nasty cut. Make sure the knife blade is not too loose, and this is also another good reason to buy a quality knife design.
  • Use your knife! Don”t be afraid to dull it or scratch it. It is a tool for one, and also it is a survival item that must be tested and proven.
  • Practice the draw regularly as mentioned above.
    • Consider this a “Every Day Carry” item. Do not get into the habit of taking it off, or throwing it on the table or in the car. Would a samurai throw his sword away to go to the bathroom, read, or train? No way and neither should you.
Copyright 2008 by duracles. Reprint permission granted if article remains completely intact.

Comments (0)

Tags: , , , , , , , , ,

Every Day Carry (EDC): Survival Cash

Posted on 19 February 2013 by duracles

Just thought since EDC has been the focus of the month for us, that I would post a quick blurb about Every Day Carry Cash. Most of us carry our credit cards, and even check books, but cash is still the emergency currency form of choice. Cash is bulky, so most of us just get by using debit or credit cards on daily purchases.

You don’t have to be Papillion to carry a hidden cache of paper money. There are sock wallets, bra wallets, money belts, neck wallets, and travel wallets usually worn under the clothing around the waist like a fanny pack. Depending on the local pick pocket culture, you may want to go with a hidden pouch. A large Pen can even carry a rolled up $100 bill inside the body, but don’t let anyone walk off with it!

As for amounts, I would hazard to say this depends on what you can afford to carry. Tying up $1000 in cash for emergency carry may or may not be too bright depending on your financial situation. You may want to keep large amounts where they can earn interest. If you can afford to carry a large amount, don’t tell anyone!

It may seem so simple that it’s stupid, but just keep it to yourself.

Every Day Carry Cash

Image courtesy / FreeDigitalPhotos.net

To keep from spending it, pretend its not there. Do not dip into it unless…. Get this…. It’s a bona fide Emergency! A soda and candy bar is not an emergency; stranded on the bad side of town at 2 am alone definitely is an emergency. You may want to carry small denominations so that you aren’t jumped the second you hand someone a $100 bill. You will also want to separate the bundle to many parts of your kit and clothing in case there is a chance of being robbed and searched.

Change is important for things like parking and phone booths, but I haven’t seen too many phone booths in the last couple of years. A pay as you go cell phone is a good thing to have, even if you particularly hate them in general. Or add a lineman’s test set phone to your kit. Either way change can be useful, especially the gold $1 coins. They are very shiny and distracting to most.

If you can swing it, $200-$500 in different denominations is most likely the best bet. This will cover cab rides, bribes, food, clothing, equipment, communications, and hotel/motel fees. Travelers Checks are good for foreign trips, but I would still include actual cash both US dollars and the local equivalent. Kept in a hidden pouch and wrapped in waterproof material, you have a way to get out of most jams.

Each adult in your family should do this, and don’t forget the teenaged kids. They may need to get a cab, ride the bus, call home, or some other emergency, so instruct them the same way you would another responsible adult. The VISA and American Express pre-paid cards would be a good alternative if they just can’t handle the pressure. Keep some cash in the house too, either hidden or locked in a safe.

Copyright 2009 by duracles. Reprint permission granted if article remains completely intact.

Comments (0)

Tags: , , , , , , , , , , , , , , , , , ,

Could YOU Evacuate? Preparing for Disaster

Posted on 11 February 2013 by duracles

It is interesting to me that as Hurricane Gustav neared, people watching TV just casually said “Well, they better evacuate.” Which brings to my mind a nagging question:

“Have YOU ever been forced to evacuate?” Rapidly followed by “How easy is it?”

I mean really, how easy is it to get the kids, family, pets, and all the gear necessary to leave for an unexpected event together and leave. I have never been forced to evacuate, but damn the headache involved is pretty stressful in itself for me. I also don”t live in Louisiana, but I do live in a state where there has been forced evacuations due to chemical spills, shootouts, tornadoes and floods.

First, how do you afford it? It can”t be cheap to just miss work, use extra gas, stay in a hotel, eat on the road, and pay for any tolls, medical emergencies, and whatever else you encounter during the hopefully motorized vehicular evac. That is if you have a vehicle road-worthy enough to make a trip somewhere out of state. How many of us have the sick days at work? What if you have a job where you simply cannot leave, and the rest of the family must leave without you, what then?

That”s a short look at the financial end. If it is life or death, and you must do it with what you have on hand I guess there is no choice. What about logistical concerns such as vehicle, gas, food, where to stay, where to go, who to leave, take, and whom to contact etc. If I were to pack up now tonight, I simply wouldn”t have enough clean underwear to begin with. Sounds humorous but its true. What would I do with my pets, plants, collectibles, valuables, trash, dirty dishes and so forth?

At the least I”d have a smelly place to come back to. With a hurricane or other disaster. you might NOT have a place to come back to. So with this reality plainly for folks to contend with, how do you not prepare?

The question is not easy to answer.

evacuate

Image courtesy of Witthaya / FreeDigitalPhotos.net

Back to financial concerns. Who has the money when life is hectic enough and filled with mini-disasters. My kid got sick, the car broke down, I”m late on the mortgage, I had to wire my parents some money, birthdays, it just never stops!

How many of us have life insurance? Health insurance? Car insurance? Investments or investment properties? We need to change our perspective on disaster preparation and begin to consider it a long term and low-risk investment. It”s really as easy as that. And it is just like car insurance; when you need it you REALLY need it and right now!

Example: A high quality tent is about $400.00 and I”m talking a four-season tent designed for three people. Basically the kind that houses people on Everest and on the Appalachian Trail. These tents can be lived in rough, hard conditions for fairly long amounts of time. A tent like this CAN be used to camp, hunt, fish, or use for the kids in the backyard. You can definitely use the tent, and still have it for emergencies. A long-term low-risk investment with the added benefit of “you can use it now.”

Let”s look at another example: Bottled water. Same thing as the tent. Durable design, safe, lasts a long time, can use it now or save it for an emergency. Need I go on?

It really is as easy as buying a few things when you have the cash. You can use a credit card if you want, but most gear is under $500 and this includes firearms. Why not save a little cash in the savings account, earn some interest and then get the money one day and buy some gear. No interest to pay this way. Some survival gear makes good presents too. Who hasn”t given someone a flashlight, Swiss army knife, or a pair of gloves as a gift sometime in their life?

Cash on hand is good too. You really need to have a little cash to grab for an emergency. Believe me, there will be a line at the ATM when you are evacuating the city in an emergency. Everyone will be doing the same stuff, so don”t be surprised when bottled water, flashlight batteries, and fuel is gone or tripled in price. There is always someone out there ready to capitalize on your misfortune, emergency or not.

For those of us without any extra funds: You can do allot by simply using what you have. If you have a suitcase, gym bag, or even a trash bag that you can use. pack it now. Put in extra clothes, blanket, shoes, kitchen knife, tools, canned food, jar of pennies etc. Just because you are broke doesn’t mean you don”t have the gear needed, you might have to search or be creative but what matters is that you pack it now.

In closing, although survival and disaster preparations are somewhat expensive it really pays to have the gear when you really need it. Ever have your car run out of gas in the middle of nowhere? Or gone to change your flat tire and realized you had no lug wrench? No car jack? No spare tire? It is easy to sit in an armchair and watch television and carelessly judge people and their choices. But when the person is you or your loved one, judgment could be very harsh. It could come in the form of needless suffering, hassle, or even cost one their life.

Basic Evacuation Kit:

  • Backpack or duffel bag
  • Bottled water, water purification pills or pump, container to carry water, and to boil water
  • Lighter, matches, magnesium starter, cotton & Vaseline
  • Map of state
  • Identification, vehicle papers, phone numbers
  • Cellular phone
  • Set of good rugged travel clothes and shoes/boots
  • Hat, jacket, gloves, sunglasses
  • medications, medical kit
  • Travel foods such as jerky, dried fruits, fresh fruits, chocolate, snacks for kids
  • Camp Axe and folding shovel
  • Tent
  • sleeping bags or blankets
  • camp mattress
  • Flashlight, extra batteries, lantern, candles
  • Toilet paper, paper towels, wash soap, towel, mirror
  • Cash
  • Radio and batteries
  • Knife, can opener, eating utensils
  • Camping or backpack stove, pots and pans for cooking, cooking oil, wash cloth
  • Some form of personal protection: Mace spray, legal firearm, baseball bat. something!
  • Automotive parts, spare tire, gas can, jumper cables, fix-a-flat, jack, basic tools

Disaster kits must be portable, water resistant, and ready to go. Place it in the trunk, by your door, in the garage, or in a closet by your entry/exit. Remember to keep it light, quiet, and pack essentials. Should not weigh so much that it cannot be carried for long distances on foot. Avoid military bags if possible, and make it something less obvious. Do not pack illegal items.

Copyright 2008 by duracles. Reprint permission granted if article remains completely intact.

Comments (0)

Tags: , , , , , , , , , , , , , , , , , , , , , , , ,

Stranded: Your Vehicle Preparedness Kit

Posted on 04 February 2013 by duracles

Thank goodness for my vehicle preparedness kit. Recently I was heading to a rural mountain security installation when my vehicle broke down. As I drove up a winding remote dirt road of steep grade, my car simply died. Heat gauge… temp slightly higher than normal. Oil… a little low, but not less than a quart. Spark…. Yes there is battery power, cables good, etc. No easily discernible culprit was immediately identifiable. Either way the end result was the same; Stranded!

Vehicle Preparedness Kit

Image courtesy of Naypong / FreeDigitalPhotos.net

This was a somewhat isolated area, and it appeared to be mostly mid priced mountain homes scattered about every ½ mile. However, there were “mountain shacks” (meaning a run down, uncared for or untended property) clearly visible which means that not everyone who lives up there has money or an upright citizen “I’m here to help” attitude. In fact some people up there appear to be openly hostile to people who don’t belong. Luckily the day was young, being only around 1:30pm, and there was plenty of time to figure out what to do.

Step 1. Call Wife and let her know where I am, where I was headed, and the fact that I was broken down and might need extraction. Problem with this plan of action is that she works on the opposite side of the state literally being about 2 and a half hours away from me at stranded location during regular daylight traffic. Notice fortunately that I was able to call my wife using my fully charged cellular phone. Amazingly, I got a signal in the mountains at all, and even more amazing that my battery was charged! I did however forget my 12v cell phone charging cable which was a bit of a concern. Cellular coverage in the mountains here forces your cell phone to constantly roam for signal which kills the battery considerably faster than normal use.

Step 2. Get off of the steep grade and find level ground on the shoulder where I could more safely ascertain my vehicle problem. This was NOT easy. My vehicle was nose facing up the mountain, packed with tools, with no power. To top that, the blind curve of the windy dirt road, trees, and drop off presented a major safety issue to backing up! I was alone with no orange cones, flares, reflectors, or orange tape to make my presence known to those ready to round that corner at who knows what speed. I turned on my hazard lights and opened the hood which is the universal language of “my car is broken down.” I prayed and on the inside of the curve backed down slowly, being careful not to end up in the inside ditch area and being cautious of the trees. Eventually after a LONG time I made it to level ground on the shoulder in a lighted area.

NOTE: You may be wondering why steps 1 and 2 are not reversed. Basically if I was to move the car, then contact my Wife. This assumes that I don’t back off the cliff side of the road, which would force me to call from the bottom where there is no signal and quite possibly I could have suffered severe injuries if I did slip off the edge. Therefore, I called first then moved the vehicle! Of course a lumber truck could have barreled up the hill as I chatted with the Wife on the phone… luckily this was not a busy road and my vehicle was far enough up the hill and past the curve that visibility ensured time for drivers to slow down, or creep around me. I didn’t encounter any vehicles until much later BTW.

Step 3. Get mobile again. Not as easy as it sounds here. The problem remained a mystery up until after about 40 minutes it just started when I tried it. I put a little oil in and checked other fluids, battery, etc again and also unloaded the security install tools to get at my auto tool kit. Beyond that, I didn’t do any real mechanical work to find the problem. I did all the basic stuff as mentioned. When it did finally start immediately I took the opportunity to turn around and head back to the shop. The problem has not reoccurred so I am still baffled. A buddy of mine expressed a similar problem with his past similar model vehicle which may be a known fuel pump issue. Vapor lock is most likely not the issue as the vehicle is fuel injected. Obviously I am not a mechanic so gear heads out there go easy on the “did you do this, that, the other thing….”.

There were a few things that came up during this whole fiasco that made me want to write on vehicle preparedness kits. The main thing that really comes to the forefront is the ability to defend one’s self when stranded in the woods. I mentioned earlier that there are “mountain shacks” in the area I was stranded in. The shoulder that I eventually coasted downhill into was under such a place. There were big dogs howling at me from up there the whole time, and a gentleman stood at his door and never took his eyes off me as I fiddled with my vehicle. Obvious or not,a service vehicle is still out of place and who knows what kind of things this guy was protecting. Possibly a drug factory, or simply protecting his property by observing an out of place situation. His body language, dogs, and barbed wire fence made the fact clear that it was not a good idea to go to him for assistance. Faded Private Property signs sealed the deal for me, so I stayed well away.

Either way my intuition told me to stay aware, and I felt comforted knowing that I could protect myself. When constructing your kit include a legally owned firearm, or at least Pepper Spray by a known quality manufacturer. Beyond that, I knew my exact location due to my brand new GPS unit. That was actually very comforting. I could have given my Wife exact latitude and longitude if I so wanted. The GPS also helped me navigate the windy mountain dirt roads. As back up, I have a map book of our state that is very precise. It is a 2005, but is pretty up to date as far as main roads are concerned. I really need to get the latest book, however. They offer the book totally laminated which makes every page waterproof, tear resistant, and easy to draw routes on with dry erase markers!

My main work van was in the shop, so much of my gear was not in this temp vehicle….Including my small survival kit with compass, matches, etc. I did have a few things however.

Here is a breakdown of what I actually had when I was stranded that day:

Cold Steel survival shovel
Kabar knife
Battery jump starter w/flashlight
GPS w 12v charger kit
14v flashlight w 2 spare fully charged batteries by Dewalt
Flannel insulated jacket
Mechanic Gloves
Plastic painters’ sheet
50 foot nylon twine

I also had my EDC kit, so basically I had a number of ways to signal, start fire, make shelter, chop wood, and a variety of good light sources. The trunk contained tools and parts mainly including basic socket set, jumper cables, gas can, oil and other fluids, new car battery, & Chilton’s repair manual. I also had a jack, spare tire (flat as it goes), selection of assorted hand tools, tow rope, and a few spare turn signal bulbs. For food I had a granola bar and water bottle with 20 oz water in my briefcase. Food and water preparations were not so good if I was stuck here overnight. I could have run out of gas, gotten a flat, or simply gotten stuck on the road somewhere and easily been there until after dark which thankfully did not happen.

Lightweight belt kit

Lightweight belt kit

Obviously, if I had a survival kit that would be a big plus. I added that when I got back. Also more water and “pogey bait”. This means a few 12 oz water bottles and some more granola bars. My Wife very wisely carries a large bag of beef jerky in her car. I’m going to add that as well to the granola bars. As mentioned, the cell phone charger would be a very nice thing to have in 12v; something which I normally have but forgot this time. In addition, a wool blanket or sleeping bag would be really great to add. I also keep a large roll of duct tape, and a coffee can in the trunk that can be made into the traditional hobo stove if need be. My survival kit has the Esbit stove and canteen cup, but redundancy is important in an emergency as we know.

Ultimately everything worked out okay in the end. The job was re-scheduled and completed, and my vehicle is running fine. There are some pretty big holes in my car kit, which are being fixed as time and money allow. Here is a list of the desired end result kit for my vehicle.

VEHICLE PREPAREDNESS KIT

Part 1 Survival

• Small Portable survival kit, ammo bag
• Survival Knife currently Ka-bar, soon to be a Cold Steel Trailmaster
• Cold Steel Survival Shovel
• Spare boots, knit cap, wool socks, gloves, jacket, sunglasses, and nylon jumpsuit
• GPS w/12v charger, Laminated State Road Map book
• Rechargeable flashlight w red lens, rechargeable spot light
• Tarp, nylon rope, nylon hammock
• Wool Blanket
• Bottled Water, Jerky, granola bars, instant soups, any lightweight portable food
(In Colorado we experience extremes in heat and cold as well as dryness and moisture so food must resist anywhere from 10 below zero to 105 above!)
• Cash in coins and paper currency


Part 2 Vehicular

• Complete replacement fluids
• Jumper cables, and battery jump starter
• Tow rope
• Spare bulbs
• Repair Manual
• Socket set, hand tools, jack
• Funnel, gas can, carpet strips, chains
• Flares, orange tape, reflector
• Duct tape, other repair gear
• Spare tire, fix a flat spray

Part 3 Communications

• Radio am/fm
• Portable wind up radio
• Cell phone, spare battery, 12v charger
• CB band radio

Part 4 Personal Defense/Hunting

• Glock 9mm Model 17, 2 spare magazines
• Kel-Tec Sub2000 9mm Carbine, 2 spare magazines
• Winchester Defender 12 gauge, assorted rounds
• Pepper Spray

Everyone has a different take on what is essential, and we are each limited by the storage space of our vehicle. My entire kit listed here fits in a sea bag, which is a canvas duffel bag but heavier duty. The Defender breaks down with a regular screwdriver and the Sub2000 folds by design. Of course, the vehicle tools are stored in the trunk area and would stay with the vehicle if I am forced to hike out. My small survival kit fits on my belt, and is the size of a camera bag with a canteen and canteen cup on the other side. My EDC (Every Day Carry) kit fits in my pockets and I always have it on me.

This vehicle preparedness kit is designed the way it is due to the nature of my job. I can end up on extreme sides of my state; either mountains or desert, dry or snow filled, muddy dirt road or iced up highway. Also, I can end up in some pretty off the beaten path places. I have literally been in a town occupied totally by a “gang”, for instance. When dealing with firearms in your kit pay attention to state and city law. For example, in Denver I can’t have the two long guns even broken down and unloaded in my vehicle. The State and other jurisdictions see things in a more reasonable light. Just be sure to follow the letter of the law. Obtaining a concealed carry permit may make this easier to do depending on your state.

UPDATE 2013: I have added and removed a few things that made my kit more compact.

Added:
(2) LED AAA Flashlights, 12v DC and 120VAC cell phone charger, (2) Wool gloves, (2) knit caps, AM/FM Short-Wave radio, pack of spare AAA batteries, updated Cold Steel GI Tanto, 3-ft bolt cutters, small sledgehammer and a spare 1st Aid Kit.

Removed:
Winchester Defender and Kel-tec Sub2000

Removed shotgun and carbine to save weight and space in order to add extra tools.

Copyright 2009 by duracles. Reprint permission granted if article remains completely intact.

Comments (0)

Advertise Here
Advertise Here